Do you want to start your first blog? Do you need easy steps to start a blog? I guess you are a beginner, right?
Alright, no matter you are a beginner or intermediate or advanced user. Everyone wants to do anything quickly (as fast as possible) including me. 🙂
So why do I share the easy way (step by step) to launch your first website in under 10 minutes.
First, keep in mind starting a blog is not as hard as you think (especially WordPress blog).
Table of Contents
How to Start a Blog?
Nowadays, starting a blog is not a hard task. However, if you are a beginner then, of course, you need a guide for that.
For building a blog you need these things:
First, Choose Blogging Niche (Topic) for Start a Blog
Choosing a blog niche is the very first step and selecting the right niche is a crucial task.
So, you need to choose blogging niche carefully, because if you select a niche where you are not interested and where you are not passionate about and where you are not engaged with, then how you can engage others and write quality content and if you not write quality content then how you can get success, right?
Blogging is not only about writing content or articles. Blogging is all about engaging others, writing quality content, and being motivated about your blog topic. So that, select a niche where you have the interest and that niche have profitable too (If you really want to make money).
A few profitable niches (topics) I listed below, you can consider for that.
Choose Blogging Platform
Many blogging platforms out there from 100% free to premium, all free platforms provide subdomains on their website. And Self-hosted WordPress gives you complete control over your blog, and you will use a custom domain like allblogideas.com.
- Self-hosted WordPress is 100% free and gives you complete control on your website. However, you need to pay for the domain and hosting (you need to install it on the server, which you get from web hosting). My Recommendation
- Fully hosted WordPress is a hosted version of WordPress. So that you can use it free of cost. However, You can get yourname.wordpress.com instead of a custom domain like wpsagar.com and host your blog on WordPress itself which means less control of you.
- Blogger is a free blogging platform offered by Google to start blogging without spending a single dollar ($). However, you get hosted by Google which means your less control on your blog.
Why You Should Choose WordPress for Blog?
Good question. The simple answer is using WordPress CMS (Content Management System) you will efficiently manage your all pages, posts, contents and you can easily change designs, add more features, and you can do a lot more just using Plugins.
So that, Install WordPress, change the theme (design) If you want, and install a few plugins and done. It is a straightforward step.
You know want more than 30% websites powered by WordPress and of course my all blogs running on it.

3 Easy Steps to Launch your Blog
If you follow this how to start a blog guide then you can easily start your first blog in under 10 minutes.
For starting a blog you need to:
- Register a domain name: You need a domain name as an address of your blog like wpsagar.com, where your content/articles get accessible from the web browser.
- Buy Web Hosting: Your domain name useless without hosting. So, to make your blog live and accessible from the web browser, you need a web host.
- Install WordPress: After buying a domain name and hosting account, you need to install WordPress on the server you will get from the web host. It is an easy task you can do under a minute.
You can complete all 3 steps in under 10 minutes. I guide you all through step by step.
Where Can I Register Domain Name for My Blog?
If you already have one skip this step.
A domain name is usually a web address in which anyone accesses your website or blog using their web browser.
Registering a domain name is as easy as shopping online. I mean you can easily register a domain name. However, before buying a domain name first, you need to choose a name for your blog (choose a domain name) and always try to register .com extension and related to your blog niche (e.g., for blogging niche blog I registered allblogideas.com).
Now time to register that name as a domain name. So, Godaddy is one of the best domain registrars out there also you can get a discount as an ABI reader. You can get .COM domain name at just $0.9. Otherwise, Namecheap is also a popular and best domain registrar, they offer free whois privacy protection.
Steps to Getting Domain on Godaddy
The first step is straightforward to click on the below button, and you get redirected to the Godaddy website.
Alter that, and enter the name on the Domain Search bar which name you choose for your blog. Then GoDaddy shows you domain names, with available extensions. To register one of them, you need to click on the “Add to Cart” button for the same domain name.
Get COM Domain Under a dollar ($0.9)
How to Buy Web Hosting?
Buying web hosting is not a hard task. However, if you want to start a blog, you might want to make money, right? You want to rank high on search engines (especially on Google SERP) to get traffic, right?
Okay.
You do not only require web hosting. However, you need good web hosting to provide the latest technologies, tight security, and a super-fast website. That is it.
So, this is why I use Rocket.net and recommend it to all of you for a high-traffic or earning website.
Why GreenGeeks for New WordPress Blog?
GreenGeeks is unique not only because it is environmentally friendly. I recommend them because I found their service, technologies, and support to be outstanding. Make sure to buy for more than one year to save money and get a free domain name.
They use the latest technologies like PHP 8, SSD storage, a free CDN, free daily backups, a free SSL certificate, and a lot more.
Alter all, you get a 30-day money-back guarantee. So, you lose nothing. 🙂
Pro Tip: Go for 3 years to save on renewal!
Note: Remember to change your DNS if you are not using GreenGeeks as your domain registrar.
How to Install WordPress on Server?
You might have a domain and web hosting ready, right?
Well,
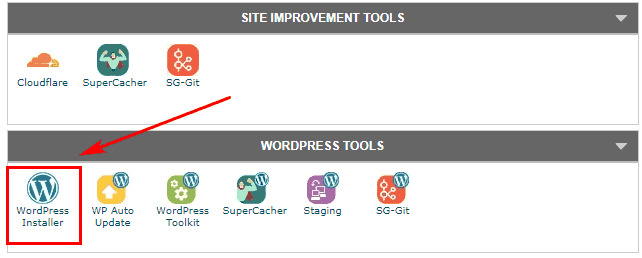
You can do this in less than a min using WordPress Installer (Softaculous Script) in cPanel.
First, you need to login into your GreenGeeks account and click on the “My Accounts” tab after that click on the “Go to cPanel” button. Now you can see a popup just click on the “Proceed” button.

After that, you can see cPanel dashboard from that click on WordPress Installer (look on WordPress Tools section).

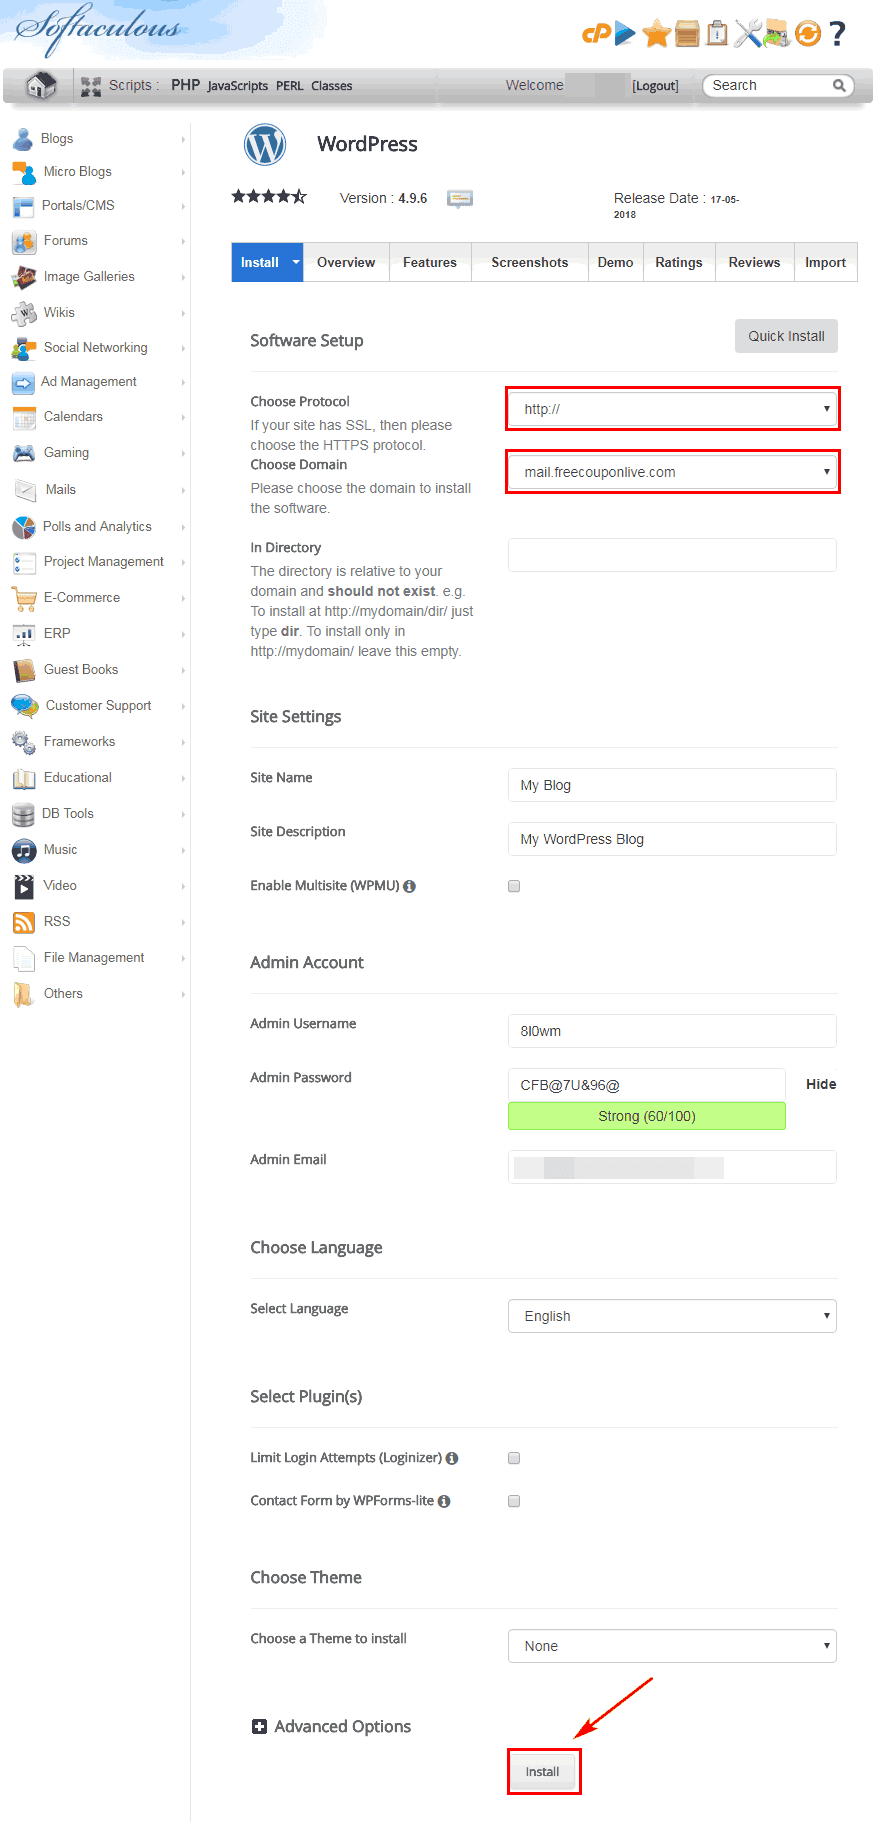
Now, click on the “Install” tab to fill details of WordPress installation. After clicking on the Install tab, you will see the WordPress install page where you need to fill details of installation.

First, choose a protocol, I mean select HTTP or HTTPS. Nowadays, it is crucial to use HTTPS (Secure HTTP), and GreenGeeks provides SSL and wildcard SSL Certificate for free. So that, select HTTPS with www or without it at your own choice (I use without www on ABI and WPSagar).
Next select the domain name from the drop-down and leave the directory empty, If you want to install WordPress in the root domain like allblogideas.com. Otherwise, enter a name as a directory like “blog” to install on allblogideas.com/blog.
Next, fill in the details in Site Settings (Site Name and Site Description). You can easily change these details after installation from the WordPress dashboard.
Next, come to the Admin Account (admin username, password, and email), where you can see all the details already filled in. However, make sure your email address is correct because you will get your WordPress login details at the same address.
I think you filled in all the required details, and now is the time to click on the final “Install” button below to get installed in a few seconds.
After all your blog is now launched and running. Login to your WordPress dashboard and write amazing articles.
- Here are My Blogging Tools for serious blogger!
Also Read: Best Recurring Affiliate Programs
If you like it, please share it with your friends, and let me know if it’s easy to start a blog nowadays.
Need any help? Contact me at sarwar@allblogideas.com


